Text-to-Speech (Recipe)
See also: - Documentaion: https://espnet.github.io/espnet - Github: https://github.com/espnet
Author: Tomoki Hayashi
Last update: 2019/07/25
Setup envrionment
[ ]:
# OS setup
!sudo apt-get install bc tree
!cat /etc/os-release

# espnet setup
!git clone https://github.com/espnet/espnet
!cd espnet; pip install -e .

# warp ctc setup
!git clone https://github.com/espnet/warp-ctc -b pytorch-1.1
!cd warp-ctc && mkdir build && cd build && cmake .. && make -j
!cd warp-ctc/pytorch_binding && python setup.py install

# kaldi setup
!cd /content/espnet/tools; git clone https://github.com/kaldi-asr/kaldi
!echo "" > ./espnet/tools/kaldi/tools/extras/check_dependencies.sh # ignore check
!chmod +x ./espnet/tools/kaldi/tools/extras/check_dependencies.sh
!cd ./espnet/tools/kaldi/tools; make sph2pipe sclite
!rm -rf espnet/tools/kaldi/tools/python
!wget https://18-198329952-gh.circle-artifacts.com/0/home/circleci/repo/ubuntu16-featbin.tar.gz
!tar -xf ./ubuntu16-featbin.tar.gz # take a few minutes
!cp featbin/* espnet/tools/kaldi/src/featbin/

# make dummy activate
!mkdir -p espnet/tools/venv/bin
!touch espnet/tools/venv/bin/activate
Run the recipe
egs/an4/tts1 as an example.egs/an4/tts1 is too small to generate reasonable speech.[ ]:
# Let's go to an4 recipe!
import os
os.chdir("/content/espnet/egs/an4/tts1")
Before running the recipe, let us check the recipe structure.
[3]:
!tree -L 1
.
├── cmd.sh
├── conf
├── data
├── downloads
├── dump
├── exp
├── fbank
├── local -> ../asr1/local
├── path.sh
├── run.sh
├── steps -> ../../../tools/kaldi/egs/wsj/s5/steps
├── tensorboard
└── utils -> ../../../tools/kaldi/egs/wsj/s5/utils

10 directories, 3 files
Each recipe has the same structure and files.
run.sh: Main script of the recipe. Once you run this script, all of the processing will be conducted from data download, preparation, feature extraction, training, and decoding.
cmd.sh: Command configuration source file about how-to-run each processing. You can modify this script if you want to run the script through job control system e.g. Slurm or Torque.
path.sh: Path configuration source file. Basically, we do not have to touch.
conf/: Directory containing configuration files.
local/: Directory containing the recipe-specific scripts e.g. data preparation.
steps/ and utils/: Directory containing kaldi tools.
Main script run.sh consists of several stages:
stage -1: Download data if the data is available online.
stage 0: Prepare data to make kaldi-stype data directory.
stage 1: Extract feature vector, calculate statistics, and perform normalization.
stage 2: Prepare a dictionary and make json files for training.
stage 3: Train the E2E-TTS network.
stage 4: Decode mel-spectrogram using the trained network.
stage 5: Generate a waveform from a generated mel-spectrogram using Griffin-Lim.
Currently, we support the following networks: - Tacotron2: Natural TTS Synthesis by Conditioning WaveNet on Mel Spectrogram Predictions - Transformer: Neural Speech Synthesis with Transformer Network - FastSpeech: FastSpeech: Fast, Robust and Controllable Text to Speech
Let us check each stage step-by-step via –stage and –stop_stage options!
Stage -1: Data download
This stage downloads dataset if the dataset is available online.
[4]:
!./run.sh --stage -1 --stop_stage -1
stage -1: Data Download
local/download_and_untar.sh: an4 directory already exists in ./downloads
dictionary: data/lang_1char/train_nodev_units.txt
[5]:
!tree -L 1
!ls downloads/
.
├── cmd.sh
├── conf
├── data
├── downloads
├── dump
├── exp
├── fbank
├── local -> ../asr1/local
├── path.sh
├── run.sh
├── steps -> ../../../tools/kaldi/egs/wsj/s5/steps
├── tensorboard
└── utils -> ../../../tools/kaldi/egs/wsj/s5/utils

10 directories, 3 files
an4  an4_sphere.tar.gz
You can see downloads directory is cretead, which containing donwloaded an4 dataset.
Stage 0: Data preparation
This stage creates kaldi-style data directories.
[6]:
!./run.sh --stage 0 --stop_stage 0
stage 0: Data preparation
dictionary: data/lang_1char/train_nodev_units.txt
[7]:
!tree -L 1 data
data
├── lang_1char
├── test
├── train
├── train_dev
└── train_nodev

5 directories, 0 files
[8]:
!ls data/*
data/lang_1char:
train_nodev_units.txt

data/test:
feats.scp  filetype  spk2utt  text  utt2num_frames  utt2spk  wav.scp

data/train:
feats.scp  filetype  spk2utt  text  utt2num_frames  utt2spk  wav.scp

data/train_dev:
feats.scp  spk2utt  text  utt2num_frames  utt2spk  wav.scp

data/train_nodev:
cmvn.ark  feats.scp  spk2utt  text  utt2num_frames  utt2spk  wav.scp
[9]:
!head -n 3 data/train/{wav.scp,text,utt2spk,spk2utt}
==> data/train/wav.scp <==
fash-an251-b /content/espnet/egs/an4/tts1/../../../tools/kaldi/tools/sph2pipe_v2.5/sph2pipe -f wav -p -c 1 ./downloads/an4/wav/an4_clstk/fash/an251-fash-b.sph |
fash-an253-b /content/espnet/egs/an4/tts1/../../../tools/kaldi/tools/sph2pipe_v2.5/sph2pipe -f wav -p -c 1 ./downloads/an4/wav/an4_clstk/fash/an253-fash-b.sph |
fash-an254-b /content/espnet/egs/an4/tts1/../../../tools/kaldi/tools/sph2pipe_v2.5/sph2pipe -f wav -p -c 1 ./downloads/an4/wav/an4_clstk/fash/an254-fash-b.sph |

==> data/train/text <==
fash-an251-b YES
fash-an253-b GO
fash-an254-b YES

==> data/train/utt2spk <==
fash-an251-b fash
fash-an253-b fash
fash-an254-b fash

==> data/train/spk2utt <==
fash fash-an251-b fash-an253-b fash-an254-b fash-an255-b fash-cen1-b fash-cen2-b fash-cen4-b fash-cen5-b fash-cen7-b
fbbh fbbh-an86-b fbbh-an87-b fbbh-an88-b fbbh-an89-b fbbh-an90-b fbbh-cen1-b fbbh-cen2-b fbbh-cen3-b fbbh-cen4-b fbbh-cen5-b fbbh-cen6-b fbbh-cen7-b fbbh-cen8-b
fclc fclc-an146-b fclc-an147-b fclc-an148-b fclc-an149-b fclc-an150-b fclc-cen1-b fclc-cen2-b fclc-cen3-b fclc-cen4-b fclc-cen5-b fclc-cen6-b fclc-cen7-b fclc-cen8-b
Each file contains the following information: - wav.scp: List of audio path. Each line has <utt_id> <wavfile_path or command pipe>. <utt_id> must be unique. - text: List of transcriptions. Each line has <utt_id> <transcription>. In the case of TTS, we assume that <transcription> is cleaned. - utt2spk: List of correspondence table between utterances and speakers. Each line has <utt_id> <speaker_id>. - spk2utt: List of correspondence table between speakers and
utterances. Each lien has <speaker_id> <utt_id> ... <utt_id>. This file can be automatically created from utt2spk.
Stage 1: Feature extration
This stage performs the following processing: 1. Mel-spectrogram extraction 2. Data split into training and validation set 2. Statistics (mean and variance) calculation 3. Normalization
[10]:
!./run.sh --stage 1 --stop_stage 1 --nj 4
stage 1: Feature Generation
/content/espnet/egs/an4/tts1/../../../utils/make_fbank.sh --cmd run.pl --nj 4 --fs 16000 --fmax  --fmin  --n_fft 1024 --n_shift 256 --win_length  --n_mels 80 data/train exp/make_fbank/train fbank
/content/espnet/egs/an4/tts1/../../../utils/make_fbank.sh: moving data/train/feats.scp to data/train/.backup
utils/validate_data_dir.sh: Successfully validated data-directory data/train
/content/espnet/egs/an4/tts1/../../../utils/make_fbank.sh: [info]: no segments file exists: assuming pcm.scp indexed by utterance.
Succeeded creating filterbank features for train
/content/espnet/egs/an4/tts1/../../../utils/make_fbank.sh --cmd run.pl --nj 4 --fs 16000 --fmax  --fmin  --n_fft 1024 --n_shift 256 --win_length  --n_mels 80 data/test exp/make_fbank/test fbank
/content/espnet/egs/an4/tts1/../../../utils/make_fbank.sh: moving data/test/feats.scp to data/test/.backup
utils/validate_data_dir.sh: Successfully validated data-directory data/test
/content/espnet/egs/an4/tts1/../../../utils/make_fbank.sh: [info]: no segments file exists: assuming pcm.scp indexed by utterance.
Succeeded creating filterbank features for test
utils/subset_data_dir.sh: reducing #utt from 948 to 100
utils/subset_data_dir.sh: reducing #utt from 948 to 848
compute-cmvn-stats scp:data/train_nodev/feats.scp data/train_nodev/cmvn.ark
LOG (compute-cmvn-stats[5.5.428~1-29b3]:main():compute-cmvn-stats.cc:168) Wrote global CMVN stats to data/train_nodev/cmvn.ark
LOG (compute-cmvn-stats[5.5.428~1-29b3]:main():compute-cmvn-stats.cc:171) Done accumulating CMVN stats for 848 utterances; 0 had errors.
/content/espnet/egs/an4/tts1/../../../utils/dump.sh --cmd run.pl --nj 4 --do_delta false data/train_nodev/feats.scp data/train_nodev/cmvn.ark exp/dump_feats/train dump/train_nodev
/content/espnet/egs/an4/tts1/../../../utils/dump.sh --cmd run.pl --nj 4 --do_delta false data/train_dev/feats.scp data/train_nodev/cmvn.ark exp/dump_feats/dev dump/train_dev
/content/espnet/egs/an4/tts1/../../../utils/dump.sh --cmd run.pl --nj 4 --do_delta false data/test/feats.scp data/train_nodev/cmvn.ark exp/dump_feats/eval dump/test
dictionary: data/lang_1char/train_nodev_units.txt
Raw filterbanks are saved in fbank/ directory with ark/scp format.
[11]:
!ls fbank
raw_fbank_test.1.ark  raw_fbank_test.4.ark   raw_fbank_train.3.ark
raw_fbank_test.1.scp  raw_fbank_test.4.scp   raw_fbank_train.3.scp
raw_fbank_test.2.ark  raw_fbank_train.1.ark  raw_fbank_train.4.ark
raw_fbank_test.2.scp  raw_fbank_train.1.scp  raw_fbank_train.4.scp
raw_fbank_test.3.ark  raw_fbank_train.2.ark
raw_fbank_test.3.scp  raw_fbank_train.2.scp
<utt_id> and <path_in_ark>.raw_fbank_*.{1..N}.{scp,ark}.[12]:
!head -n 3 fbank/raw_fbank_train.1.scp
fash-an251-b /content/espnet/egs/an4/tts1/fbank/raw_fbank_train.1.ark:13
fash-an253-b /content/espnet/egs/an4/tts1/fbank/raw_fbank_train.1.ark:5727
fash-an254-b /content/espnet/egs/an4/tts1/fbank/raw_fbank_train.1.ark:9921
These files can be loaded in python via kaldiio as follows:
[13]:
import kaldiio
import matplotlib.pyplot as plt

# load scp file
scp_dict = kaldiio.load_scp("fbank/raw_fbank_train.1.scp")
for key in scp_dict:
    plt.imshow(scp_dict[key].T[::-1])
    plt.title(key)
    plt.colorbar()
    plt.show()
    break

# load ark file
ark_generator = kaldiio.load_ark("fbank/raw_fbank_train.1.ark")
for key, array in ark_generator:
    plt.imshow(array.T[::-1])
    plt.title(key)
    plt.colorbar()
    plt.show()
    break

<utt_id>.[14]:
!ls data/train
!head -n 3 data/train/{feats.scp,utt2num_frames}
feats.scp  filetype  spk2utt  text  utt2num_frames  utt2spk  wav.scp
==> data/train/feats.scp <==
fash-an251-b /content/espnet/egs/an4/tts1/fbank/raw_fbank_train.1.ark:13
fash-an253-b /content/espnet/egs/an4/tts1/fbank/raw_fbank_train.1.ark:5727
fash-an254-b /content/espnet/egs/an4/tts1/fbank/raw_fbank_train.1.ark:9921

==> data/train/utt2num_frames <==
fash-an251-b 63
fash-an253-b 44
fash-an254-b 57
And data/train/ directory is split into two directory: - data/train_nodev/: data directory for training - data/train_dev/: data directory for validation
[15]:
!ls data
!ls data/train_*
lang_1char  test  train  train_dev  train_nodev
data/train_dev:
feats.scp  spk2utt  text  utt2num_frames  utt2spk  wav.scp

data/train_nodev:
cmvn.ark  feats.scp  spk2utt  text  utt2num_frames  utt2spk  wav.scp
[16]:
# load cmvn.ark file (Be careful not load_ark, but load_mat)
cmvn = kaldiio.load_mat("data/train_nodev/cmvn.ark")

# cmvn consists of mean and variance, the last dimension of mean represents the number of frames.
print("cmvn shape = "+ str(cmvn.shape))

# calculate mean and variance
mu = cmvn[0, :-1] / cmvn[0, -1]
var = cmvn[1, :-1] / cmvn[0, -1]

# show mean
print("mean = " + str(mu))
print("variance = " + str(var))
cmvn shape = (2, 81)
mean = [-2.3015275 -2.1957324 -1.9654763 -1.9376634 -1.7633141 -1.6846672
 -1.7875645 -1.9486219 -1.9248276 -1.8872185 -1.9270604 -1.991474
 -1.9778731 -2.09246   -2.1971824 -2.209918  -2.3019788 -2.2964242
 -2.32575   -2.3705876 -2.40271   -2.449803  -2.4300003 -2.466036
 -2.5255735 -2.5386114 -2.582323  -2.5250685 -2.6118424 -2.632455
 -2.6633208 -2.672028  -2.6356308 -2.6361263 -2.6829064 -2.691491
 -2.694131  -2.675015  -2.6734142 -2.665589  -2.6630545 -2.6658235
 -2.657909  -2.6691167 -2.6635575 -2.6643658 -2.6674545 -2.661883
 -2.6606252 -2.657067  -2.6489155 -2.6527998 -2.6650834 -2.678152
 -2.698867  -2.708589  -2.7201533 -2.7215238 -2.7254083 -2.7388637
 -2.7713299 -2.8122768 -2.8621979 -2.9113584 -2.9572158 -3.0068166
 -3.0537205 -3.1046875 -3.160605  -3.2164888 -3.2550604 -3.2886407
 -3.3207698 -3.3445303 -3.3530545 -3.3561647 -3.357716  -3.3631625
 -3.3077478 -3.2325494]
variance = [ 5.478512   5.1941466  4.6532855  4.389601   3.6336286  3.4551063
  3.7337823  4.3736997  4.2437925  4.1938186  4.4535246  4.6856284
  4.5197277  4.960779   5.486998   5.5303926  5.9634395  5.9297132
  6.0229506  6.2188787  6.402854   6.6038113  6.456947   6.6182714
  6.9164844  6.9951644  7.2030034  6.832003   7.333239   7.455782
  7.639241   7.6680694  7.402422   7.3907475  7.693637   7.768753
  7.773008   7.671266   7.682944   7.639572   7.626395   7.6473846
  7.611816   7.679605   7.6519523  7.658576   7.6860723  7.670902
  7.6756134  7.674951   7.639459   7.6657314  7.7366185  7.789132
  7.8906317  7.934334   8.0020485  8.016449   8.038348   8.104283
  8.278971   8.490983   8.759398   9.036307   9.297286   9.589112
  9.866017  10.173562  10.518697  10.873265  11.115793  11.32935
 11.530077  11.672476  11.716665  11.724409  11.7235985 11.751684
 11.366631  10.894848 ]
[17]:
!ls dump/*
dump/test:
data.json    feats.2.ark  feats.3.scp  feats.scp  utt2num_frames
feats.1.ark  feats.2.scp  feats.4.ark  filetype
feats.1.scp  feats.3.ark  feats.4.scp  log

dump/train_dev:
data.json    feats.2.ark  feats.3.scp  feats.scp  utt2num_frames
feats.1.ark  feats.2.scp  feats.4.ark  filetype
feats.1.scp  feats.3.ark  feats.4.scp  log

dump/train_nodev:
data.json    feats.2.ark  feats.3.scp  feats.scp  utt2num_frames
feats.1.ark  feats.2.scp  feats.4.ark  filetype
feats.1.scp  feats.3.ark  feats.4.scp  log
Stage 2: Dictionary and json preparation
This stage creates dictrionary from data/train_nodev/text and makes json file for training.
[18]:
!./run.sh --stage 2 --stop_stage 2
dictionary: data/lang_1char/train_nodev_units.txt
stage 2: Dictionary and Json Data Preparation
28 data/lang_1char/train_nodev_units.txt
/content/espnet/egs/an4/tts1/../../../utils/data2json.sh --feat dump/train_nodev/feats.scp data/train_nodev data/lang_1char/train_nodev_units.txt
/content/espnet/egs/an4/tts1/../../../utils/feat_to_shape.sh --cmd run.pl --nj 1 --filetype  --preprocess-conf  --verbose 0 dump/train_nodev/feats.scp data/train_nodev/tmp-6VLm9/input/shape.scp
/content/espnet/egs/an4/tts1/../../../utils/data2json.sh --feat dump/train_dev/feats.scp data/train_dev data/lang_1char/train_nodev_units.txt
/content/espnet/egs/an4/tts1/../../../utils/feat_to_shape.sh --cmd run.pl --nj 1 --filetype  --preprocess-conf  --verbose 0 dump/train_dev/feats.scp data/train_dev/tmp-g5AHB/input/shape.scp
/content/espnet/egs/an4/tts1/../../../utils/data2json.sh --feat dump/test/feats.scp data/test data/lang_1char/train_nodev_units.txt
/content/espnet/egs/an4/tts1/../../../utils/feat_to_shape.sh --cmd run.pl --nj 1 --filetype  --preprocess-conf  --verbose 0 dump/test/feats.scp data/test/tmp-U7FtO/input/shape.scp
<token> <token index>.<token index> starts from 1 because 0 is used as padding index.[19]:
!ls data
!cat data/lang_1char/train_nodev_units.txt
lang_1char  test  train  train_dev  train_nodev
<unk> 1
<space> 2
A 3
B 4
C 5
D 6
E 7
F 8
G 9
H 10
I 11
J 12
K 13
L 14
M 15
N 16
O 17
P 18
Q 19
R 20
S 21
T 22
U 23
V 24
W 25
X 26
Y 27
Z 28
Json file will be created for training / validation /evaludation sets and they are saved as dump/{train_nodev,train_dev,test}/data.json.
[20]:
!ls dump/*/*.json
dump/test/data.json dump/train_dev/data.json dump/train_nodev/data.json
Each json file contains all of the information in the data directory.
[21]:
!head -n 27 dump/train_nodev/data.json
{
    "utts": {
        "fash-an251-b": {
            "input": [
                {
                    "feat": "/content/espnet/egs/an4/tts1/dump/train_nodev/feats.1.ark:13",
                    "name": "input1",
                    "shape": [
                        63,
                        80
                    ]
                }
            ],
            "output": [
                {
                    "name": "target1",
                    "shape": [
                        3,
                        30
                    ],
                    "text": "YES",
                    "token": "Y E S",
                    "tokenid": "27 7 21"
                }
            ],
            "utt2spk": "fash"
        },
“shape”: Shape of the input or output sequence. Here input shape [63, 80] represents the number of frames = 63 and the dimension of mel-spectrogram = 80.
“text”: Original transcription.
“token”: Token sequence of original transcription.
“tokenid” Token id sequence of original transcription, which is converted using the dictionary.
Now ready to start training!
Stage 3: Network training
[22]:
!cat conf/train_pytorch_tacotron2.yaml
# This is the basic tactron2 training settting

# encoder related
embed-dim: 512
elayers: 1
eunits: 512
econv-layers: 3 # if set 0, no conv layer is used
econv-chans: 512
econv-filts: 5

# decoder related
dlayers: 2
dunits: 1024
prenet-layers: 2  # if set 0, no prenet is used
prenet-units: 256
postnet-layers: 5 # if set 0, no postnet is used
postnet-chans: 512
postnet-filts: 5

# attention related
atype: location
adim: 128
aconv-chans: 32
aconv-filts: 15      # resulting in filter-size = aconv-filts * 2 + 1
cumulate-att-w: true # whether to cumulate attetion weight
use-batch-norm: true # whether to use batch normalization in conv layer
use-concate: true    # whether to concatenate encoder embedding with decoder lstm outputs
use-residual: false  # whether to use residual connection in encoder convolution
use-masking: true    # whether to mask the padded part in loss calculation
bce-pos-weight: 1.0  # weight for positive samples of stop token in cross-entropy calculation
reduction-factor: 2

# minibatch related
batch-size: 32
batch-sort-key: shuffle # shuffle or input or output
maxlen-in: 150     # if input length  > maxlen-in, batchsize is reduced (if use "shuffle", not effect)
maxlen-out: 400    # if output length > maxlen-out, batchsize is reduced (if use "shuffle", not effect)

# optimization related
lr: 1e-3
eps: 1e-6
weight-decay: 0.0
dropout-rate: 0.5
zoneout-rate: 0.1
epochs: 50
patience: 5
[23]:
# TODO(kan-bayashi): Change here to use change_yaml.py
!cat conf/train_pytorch_tacotron2.yaml | sed -e "s/epochs: 50/epochs: 3/g" > conf/train_pytorch_tacotron2_sample.yaml
!cat conf/train_pytorch_tacotron2_sample.yaml
# This is the basic tactron2 training settting

# encoder related
embed-dim: 512
elayers: 1
eunits: 512
econv-layers: 3 # if set 0, no conv layer is used
econv-chans: 512
econv-filts: 5

# decoder related
dlayers: 2
dunits: 1024
prenet-layers: 2  # if set 0, no prenet is used
prenet-units: 256
postnet-layers: 5 # if set 0, no postnet is used
postnet-chans: 512
postnet-filts: 5

# attention related
atype: location
adim: 128
aconv-chans: 32
aconv-filts: 15      # resulting in filter-size = aconv-filts * 2 + 1
cumulate-att-w: true # whether to cumulate attetion weight
use-batch-norm: true # whether to use batch normalization in conv layer
use-concate: true    # whether to concatenate encoder embedding with decoder lstm outputs
use-residual: false  # whether to use residual connection in encoder convolution
use-masking: true    # whether to mask the padded part in loss calculation
bce-pos-weight: 1.0  # weight for positive samples of stop token in cross-entropy calculation
reduction-factor: 2

# minibatch related
batch-size: 32
batch-sort-key: shuffle # shuffle or input or output
maxlen-in: 150     # if input length  > maxlen-in, batchsize is reduced (if use "shuffle", not effect)
maxlen-out: 400    # if output length > maxlen-out, batchsize is reduced (if use "shuffle", not effect)

# optimization related
lr: 1e-3
eps: 1e-6
weight-decay: 0.0
dropout-rate: 0.5
zoneout-rate: 0.1
epochs: 3
patience: 5
[24]:
!./run.sh --stage 3 --stop_stage 3 --train_config conf/train_pytorch_tacotron2_sample.yaml --verbose 1
dictionary: data/lang_1char/train_nodev_units.txt
stage 3: Text-to-speech model training
^C
You can see the training log in exp/train_*/train.log.
The models are saved in exp/train_*/results/ directory.
[26]:
!ls exp/train_nodev_pytorch_train_pytorch_tacotron2_sample/{results,results/att_ws}
exp/train_nodev_pytorch_train_pytorch_tacotron2_sample/results:
all_loss.png  l1_loss.png  model.loss.best  snapshot.ep.2
att_ws        loss.png     mse_loss.png     snapshot.ep.3
bce_loss.png  model.json   snapshot.ep.1

exp/train_nodev_pytorch_train_pytorch_tacotron2_sample/results/att_ws:
fash-an251-b.ep.1.png  fash-an253-b.ep.3.png  fash-an255-b.ep.2.png
fash-an251-b.ep.2.png  fash-an254-b.ep.1.png  fash-an255-b.ep.3.png
fash-an251-b.ep.3.png  fash-an254-b.ep.2.png  fash-cen1-b.ep.1.png
fash-an253-b.ep.1.png  fash-an254-b.ep.3.png  fash-cen1-b.ep.2.png
fash-an253-b.ep.2.png  fash-an255-b.ep.1.png  fash-cen1-b.ep.3.png
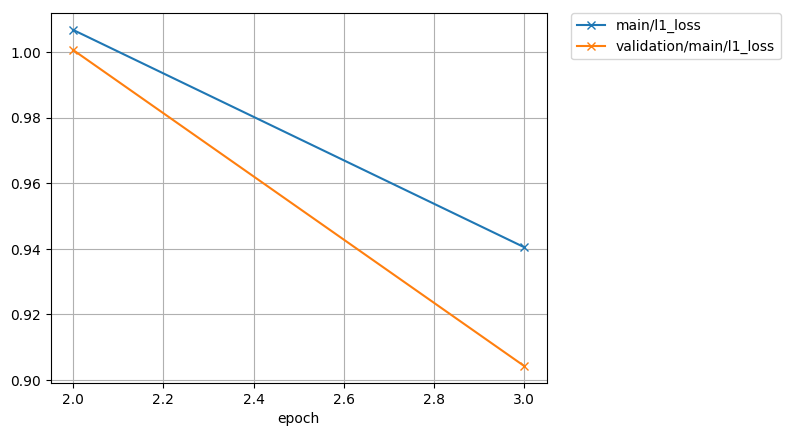
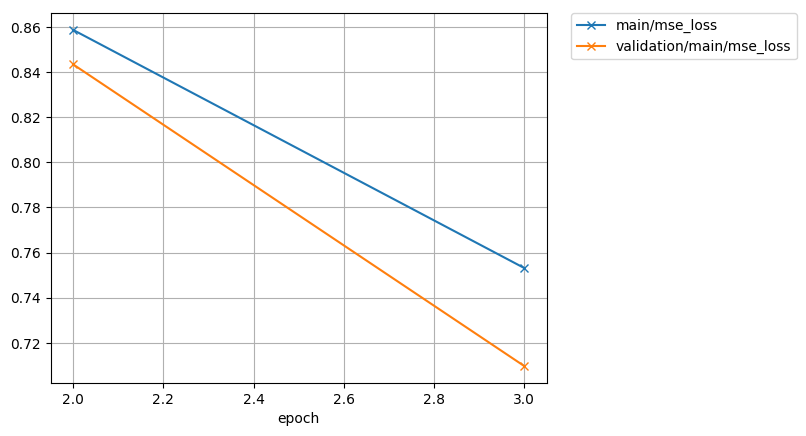
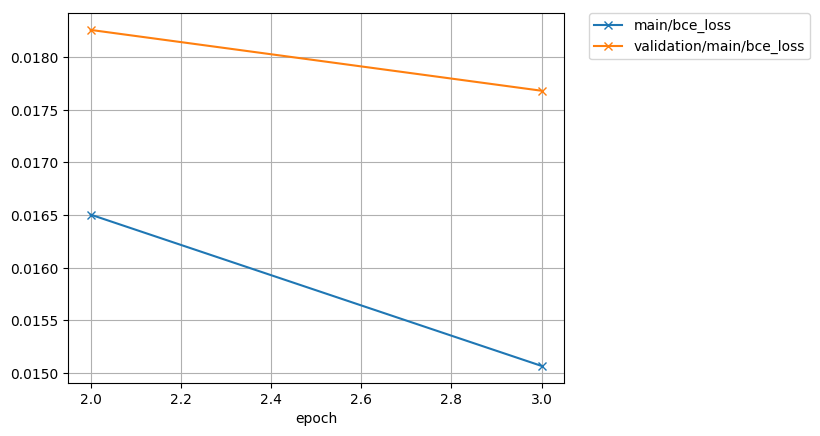
exp/train_*/results/*.png are the figures of training curve.
[27]:
from IPython.display import Image, display_png
print("all loss curve")
display_png(Image("exp/train_nodev_pytorch_train_pytorch_tacotron2_sample/results/all_loss.png"))
print("l1 loss curve")
display_png(Image("exp/train_nodev_pytorch_train_pytorch_tacotron2_sample/results/l1_loss.png"))
print("mse loss curve")
display_png(Image("exp/train_nodev_pytorch_train_pytorch_tacotron2_sample/results/mse_loss.png"))
print("bce loss curve")
display_png(Image("exp/train_nodev_pytorch_train_pytorch_tacotron2_sample/results/bce_loss.png"))
all loss curve

l1 loss curve
mse loss curve
bce loss curve
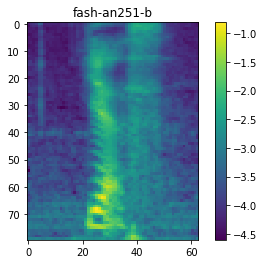
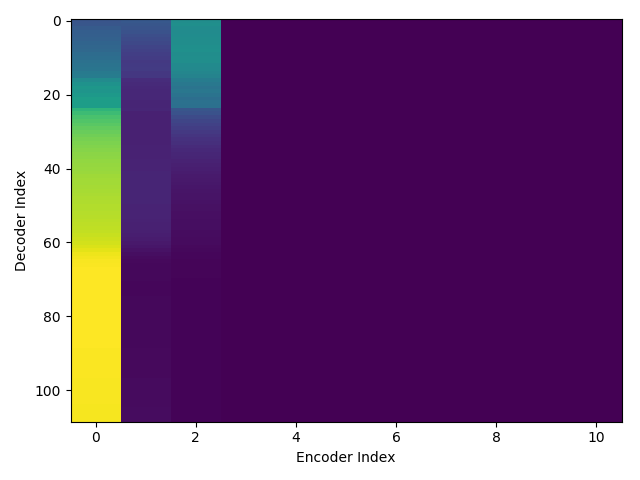
exp/train_*/results/att_ws/.png are the figures of attention weights in each epoch.
[28]:
print("Attention weights of initial epoch")
display_png(Image("exp/train_nodev_pytorch_train_pytorch_tacotron2_sample/results/att_ws/fash-cen1-b.ep.1.png"))
Attention weights of initial epoch
exp/train_*/results/model.loss.best contains only the model parameters.exp/train_*/results/snapshot contains the model parameters, optimizer states, and iterator states.[ ]:
# resume training from snapshot.ep.2
!./run.sh --stage 3 --stop_stage 3 --train_config conf/train_pytorch_tacotron2_sample.yaml --resume exp/train_nodev_pytorch_train_pytorch_tacotron2_sample/results/snapshot.ep.2 --verbose 1
dictionary: data/lang_1char/train_nodev_units.txt
stage 3: Text-to-speech model training
[ ]:
!cat exp/train_nodev_pytorch_train_pytorch_tacotron2_sample/train.log
[ ]:
%load_ext tensorboard
%tensorboard --logdir tensorboard/train_nodev_pytorch_train_pytorch_tacotron2_sample/
Stage 4: Network decoding
This stage performs decoding using the trained model to generate mel-spectrogram from a given text.
[ ]:
!./run.sh --stage 4 --stop_stage 4 --nj 8 --train_config conf/train_pytorch_tacotron2_sample.yaml
Generated features are saved as ark/scp format.
[ ]:
!ls exp/train_nodev_pytorch_train_pytorch_tacotron2_sample/outputs_model.loss.best_decode/*
We can specify the model or snapshot to be used for decoding via –model.
[ ]:
!./run.sh --stage 4 --stop_stage 4 --nj 8 --train_config conf/train_pytorch_tacotron2_sample.yaml --model snapshot.ep.2
[ ]:
!ls exp/train_nodev_pytorch_train_pytorch_tacotron2_sample/outputs_snapshot.ep.2_decode/*
Stage 5: Waveform synthesis
[ ]:
!./run.sh --stage 5 --stop_stage 5 --nj 8 --train_config conf/train_pytorch_tacotron2_sample.yaml --griffin_lim_iters 50
Generated wav files are saved in exp/train_nodev_pytorch_train_pytorch_tacotron2_sample/outputs_model.loss.best_decode_denorm/*/wav
[ ]:
!ls exp/train_nodev_pytorch_train_pytorch_tacotron2_sample/outputs_model.loss.best_decode_denorm/*/wav
[ ]:
!tree -L 3
NEXT step
Try pretrained model to generate speech.
Try a large single speaker dataset recipe egs/ljspeech/tts1.
Try a large multi-speaker recipe egs/libritts/tts1.
Make the original recipe using your own dataset.